Large-scale optical elements, especially aspherical ones, are extensively used in large laser facilities such as Shen Guang II laser facility. Surface measurement is necessary in manufacturing optical elements, and there is always a strong demand for quick measurement. Currently, three coordinate measuring machine (CMM) is usually used as measuring apparatus in the grinding procedure.
Despite its advantage of high precision, such a point-by-point measuring instrument is inefficient for large-scale rough optical elements. In addition, the cost of large-scale CMM is too high to be affordable for most users.
Recently, by using binocular vision profilemetry, researchers from Shanghai Institute of Optics and Fine Mechanics of the Chinese Academy of Sciences, tried a new way to achieve a fast, low-cost and full-field method. The results were published in Optics Express.
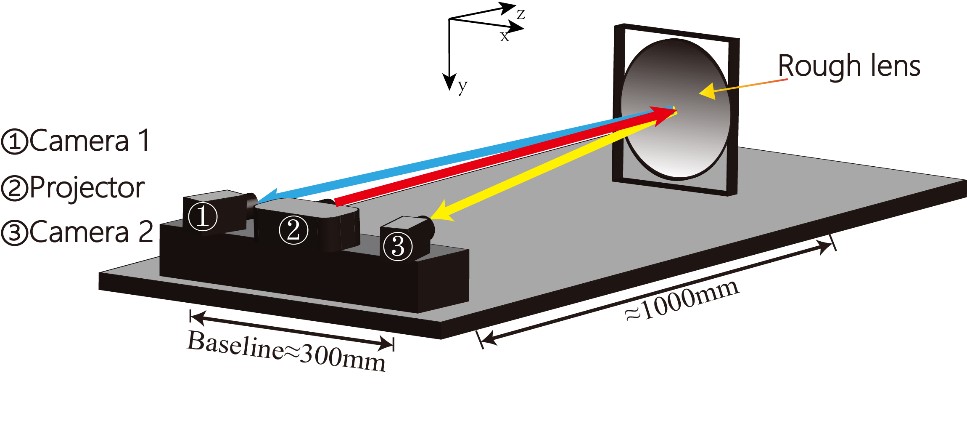
In their experiment, an optical three-dimensional (3D) measurement method of binocular structure is used to measure a large-scale (300 mm) rough lens.
The principle of binocular vision profilometry is similar to the depth perception of human eyes. 20 images were projected onto the rough lens sequentially and imaged on two cameras simultaneously, and then the whole surface could be reconstructed by calculating disparities between homologous points.

Fig. 1. Schematic diagram of stereo profilometry system. (Image by SIOM)
There are some problems to be taken into account in 3D profilometry of rough lens. Considering the strong scattering of the rough lens, the method of combining band-limited pseudo-random pattern and temporal coding was proposed in the experiment.
Moreover, researchers utilized polarization technique to eliminate multiple reflection and obtained clear images of lens surface. Finally, a dense and full-field 3D points cloud was successfully reconstructed in a short time.

Fig. 2. 3D points cloud of the rough lens (Image by SIOM)
Another fact is that the measurement accuracy of this method is not as high as that of CMM. In solving this problem, this method could reconstruct the whole surface in a short time and quickly locates the areas to be checked in details, and then CMM would analyze these areas accurately to guide the processing for manufacturing.
Since this method achieved a fast, full-filed and cheap measurement of a rough lens, it has great advantages over CMM in these aspects and is promising in the measurement of large-scale (meter-size) rough optical elements in the future.

86-10-68597521 (day)
86-10-68597289 (night)

86-10-68511095 (day)
86-10-68512458 (night)

cas_en@cas.cn

52 Sanlihe Rd., Xicheng District,
Beijing, China (100864)

